> ## Documentation Index
> Fetch the complete documentation index at: https://docs.ag2.ai/llms.txt
> Use this file to discover all available pages before exploring further.

# Streaming input and output using WebSockets

<div>
  <img noZoom className="social-share-img" src="https://media.githubusercontent.com/media/ag2ai/ag2/refs/heads/main/website/static/img/cover.png" alt="social preview" style={{ position: 'absolute', left: '-9999px' }} />
</div>

<div class="blog-authors">
  <p class="authors">Authors:</p>

  <CardGroup cols={2}>
    <Card href="https://github.com/marklysze">
      <div class="col card">
        <div class="img-placeholder">
          <img noZoom src="https://github.com/marklysze.png" />
        </div>

        <div>
          <p class="name">Mark Sze</p>
          <p>Software Engineer at AG2.ai</p>
        </div>
      </div>
    </Card>

    <Card href="https://github.com/sternakt">
      <div class="col card">
        <div class="img-placeholder">
          <img noZoom src="https://github.com/sternakt.png" />
        </div>

        <div>
          <p class="name">Tvrtko Sternak</p>
          <p>Machine Learning Engineer at Airt</p>
        </div>
      </div>
    </Card>

    <Card href="https://github.com/davorrunje">
      <div class="col card">
        <div class="img-placeholder">
          <img noZoom src="https://github.com/davorrunje.png" />
        </div>

        <div>
          <p class="name">Davor Runje</p>
          <p>CTO at Airt</p>
        </div>
      </div>
    </Card>
  </CardGroup>
</div>

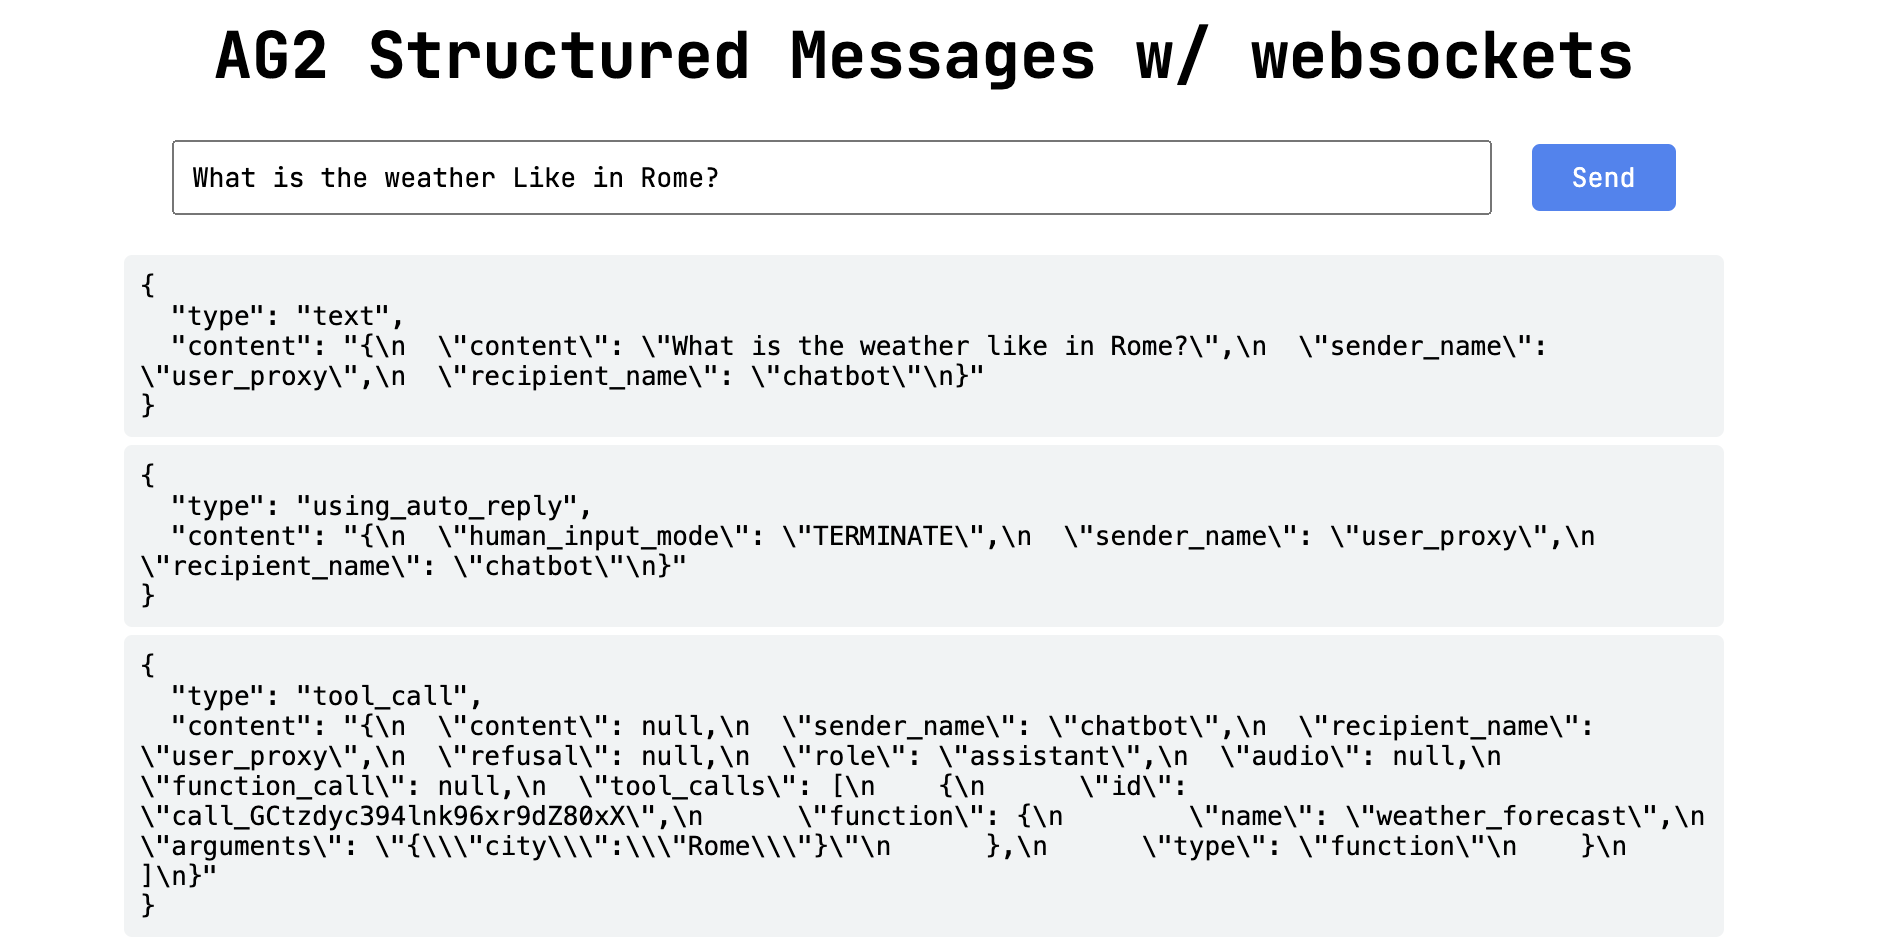
<img src="https://mintcdn.com/ag2ai/8Ul2s9H6RGKWz5Lk/docs/blog/2025-01-10-WebSockets/img/structured_messages_with_websockets.png?fit=max&auto=format&n=8Ul2s9H6RGKWz5Lk&q=85&s=b011267f734962d7054f6d78829a2714" alt="Structured messages with websockets client" width="1904" height="940" data-path="docs/blog/2025-01-10-WebSockets/img/structured_messages_with_websockets.png" />

## **TL;DR**

* Learn how to build an agent chat application using [WebSockets](https://fastapi.tiangolo.com/advanced/websockets/) and [`IOStream`](/docs/api-reference/autogen/io/IOStream)
* Explore a hands-on example of connecting a web application to a responsive chat with agents over [WebSockets](https://fastapi.tiangolo.com/advanced/websockets/).
* **Streamlined Real-Time Interactions**: [WebSockets](https://fastapi.tiangolo.com/advanced/websockets/) offer a low-latency, persistent connection for sending and receiving data in real time.

***

## **Real-Time Applications: Why WebSockets?**

[WebSockets](https://fastapi.tiangolo.com/advanced/websockets/) provide a powerful framework for real-time communication between a client and server. Unlike traditional HTTP requests, which require polling for updates, [WebSockets](https://fastapi.tiangolo.com/advanced/websockets/) establish a persistent, full-duplex connection that allows for continuous data exchange.

This capability is critical for applications that use AG2, where seamless interaction is essential.

### **Key Benefits of WebSockets**

1. **Low Latency**: [WebSockets](https://fastapi.tiangolo.com/advanced/websockets/) reduce latency by maintaining a direct, open connection, avoiding the overhead of repeated HTTP handshakes.
2. **Efficient Data Streaming**: Continuous, two-way data streams enable smooth user experiences in real-time applications.
3. **Event-Driven Communication**: With WebSocket protocols, the server can "push" updates to the client as events occur.
4. **Simplified Architecture**: [WebSockets](https://fastapi.tiangolo.com/advanced/websockets/) eliminate the need for separate polling mechanisms, reducing server load and complexity.

***

## **Building a chat System**

This example demonstrates how to create a WebSocket-based chat system that streams real-time input and output from AG2 Agents.

### **How It Works**

1. **WebSocket Connection**: The client establishes a persistent WebSocket connection to the server.
2. **Real-Time Data Flow**: Events in the conversation are streamed over [WebSockets](https://fastapi.tiangolo.com/advanced/websockets/) to the browser where they can be displayed.

## **Example: Creating a Weather chat app**

Let’s walk through an example that integrates [WebSockets](https://fastapi.tiangolo.com/advanced/websockets/) with a weather-focused chat.

<Note>You can explore the full example code [here](https://github.com/ag2ai/agentchat-over-websockets).</Note>

### **1. Clone the Repository**

```bash theme={null}
git clone https://github.com/ag2ai/agentchat-over-websockets.git
cd agentchat-over-websockets
```

### **2. Set Up Environment Variables**

Create a `OAI_CONFIG_LIST` file based on the provided `OAI_CONFIG_LIST_sample`:

```bash theme={null}
cp OAI_CONFIG_LIST_sample OAI_CONFIG_LIST
```

In the OAI\_CONFIG\_LIST file, update the `api_key` to your OpenAI API key.

### (Optional) Create and use a virtual environment

To reduce cluttering your global Python environment on your machine, you can create a virtual environment. On your command line, enter:

```
python3 -m venv env
source env/bin/activate
```

### **3. Install Dependencies**

Install the required Python packages using `pip`:

```bash theme={null}
pip install -r requirements.txt
```

### **4. Start the Server**

Run the `main.py` file:

```bash theme={null}
python agentchat-over-websockets/main.py
```

### **Test the App**

With the server running, open the client application in your browser by navigating to [http://localhost:8001/](http://localhost:8001/). And send a message to the chat and watch the conversation between agents roll out in your browser.

## Code review

### **Backend Code: [`main.py`](https://github.com/ag2ai/agentchat-over-websockets/blob/main/agentchat-over-websockets/main.py)**

The backend is responsible for serving the frontend, managing WebSocket connections, and hosting the AI-powered conversational agent. Below is a step-by-step breakdown.

#### **Setting Up the WebSocket Server**

The `IOWebsockets.run_server_in_thread` utility is used to run a WebSocket server. The `on_connect` function handles new client connections and initializes the chatbot.

```python theme={null}
from autogen.io.websockets import IOWebsockets
from datetime import datetime

def on_connect(iostream: IOWebsockets) -> None:
    print(f"Connected to client: {iostream}")
    initial_msg = iostream.input()  # Receive the first message from the client.
    print(f"Initial message: {initial_msg}")

    # Define the agent
    agent = autogen.ConversableAgent(
        name="chatbot",
        system_message="Complete tasks and reply TERMINATE when done. Use the 'weather_forecast' tool for weather-related queries.",
        llm_config={"stream": False},
    )

    # Define the user proxy
    user_proxy = autogen.UserProxyAgent(
        name="user_proxy",
        system_message="A proxy for the user.",
        is_termination_msg=lambda msg: msg.get("content", "").endswith("TERMINATE"),
        human_input_mode="NEVER",
    )

    # Register tool functions
    def weather_forecast(city: str) -> str:
        return f"The weather forecast for {city} is sunny as of {datetime.now()}."

    autogen.register_function(
        weather_forecast,
        caller=agent,
        executor=user_proxy,
        description="Provides a mock weather forecast.",
    )

    # Initiate conversation
    user_proxy.initiate_chat(agent, message=initial_msg)
```

**Explanation:**

1. **`on_connect`**: Handles client connections and manages the interaction between the [**`ConversableAgent`**](/docs/api-reference/autogen/ConversableAgent#conversableagent) and the client.
2. **Tool Registration**: The `weather_forecast` function provides a mock weather report and is linked to the agent for handling weather-related queries.

***

#### **Serving the Frontend**

The `SimpleHTTPRequestHandler` is used to serve HTML files. A custom handler class overrides the behavior for the root path to serve `chat.html`.

```python theme={null}
class MyRequestHandler(SimpleHTTPRequestHandler):
    def __init__(self, *args, **kwargs):
        super().__init__(*args, directory=Path(__file__).parent / "website_files" / "templates", **kwargs)

    def do_GET(self):
        if self.path == "/":
            self.path = "/chat.html"
        return super().do_GET()
```

**Explanation:**

* The `MyRequestHandler` class ensures that the default page served is `chat.html`.
* Files are served from the `website_files/templates` directory.

#### **Running the Servers**

Finally, both the WebSocket and HTTP servers are started.

```python theme={null}
from http.server import HTTPServer

PORT = 8001

handler = MyRequestHandler

# Start WebSocket server
with IOWebsockets.run_server_in_thread(on_connect=on_connect, port=8080) as uri:
    print(f"WebSocket server started at {uri}")

    # Start HTTP server
    with HTTPServer(("", PORT), handler) as httpd:
        print(f"HTTP server started at http://localhost:{PORT}")
        try:
            httpd.serve_forever()
        except KeyboardInterrupt:
            print("HTTP server stopped.")
```

**Explanation:**

* The WebSocket server listens on port `8080`, while the HTTP server listens on port `8001`.
* The WebSocket server handles real-time communication, while the HTTP server serves static files.

***

### **Frontend Code: [`chat.html`](https://github.com/ag2ai/agentchat-over-websockets/blob/main/agentchat-over-websockets/website_files/templates/chat.html)**

The frontend provides a simple interface for users to interact with the chatbot.

***

#### **HTML Structure**

The HTML structure defines an input form for sending messages and a list for displaying them.

```html theme={null}
<!DOCTYPE html>
<html>
<head>
    <title>Chat Interface</title>
    <style>
        body { font-family: monospace; max-width: 800px; margin: 20px auto; }
        #messages { list-style: none; padding: 0; }
        #messages li { background: #f1f3f4; padding: 8px; border-radius: 4px; margin: 4px 0; }
    </style>
</head>
<body>
    <h1>AI Chat Interface</h1>
    <form onsubmit="sendMessage(event)">
        <input type="text" id="messageText" autocomplete="off" />
        <button>Send</button>
    </form>
    <ul id="messages"></ul>
</body>
</html>
```

***

#### **JavaScript Logic**

The JavaScript code establishes a WebSocket connection, handles incoming messages, and sends user input to the backend.

```javascript theme={null}
var ws = new WebSocket("ws://localhost:8080");

ws.onmessage = function(event) {
    var messages = document.getElementById('messages');
    var message = document.createElement('li');
    message.textContent = event.data;  // Display the message content.
    messages.appendChild(message);
};

function sendMessage(event) {
    var input = document.getElementById("messageText");
    ws.send(input.value);  // Send the input value to the backend.
    input.value = '';  // Clear the input field.
    event.preventDefault();  // Prevent form submission.
}
```

**Explanation:**

1. **WebSocket Initialization**: Connects to the WebSocket server at `ws://localhost:8080`.
2. **Message Display**: Appends incoming messages to the `#messages` list.
3. **Sending Messages**: Captures user input, sends it to the server, and clears the input field.

## **Conclusion**

Building an AgentChat system with [WebSockets](https://fastapi.tiangolo.com/advanced/websockets/) unlocks the potential for real-time, interactive applications. By maintaining a persistent connection, [WebSockets](https://fastapi.tiangolo.com/advanced/websockets/) enable seamless communication, enhancing user experience with minimal latency.

The example of a weather chatbot demonstrates the ease of integrating AG2 with [WebSockets](https://fastapi.tiangolo.com/advanced/websockets/) to create dynamic conversational agents. Whether for customer support, virtual assistants, or personalized services, this architecture provides a robust foundation for building next-generation applications.

**Ready to start building?** Explore the full example code [here](https://github.com/ag2ai/agentchat-over-websockets).

<div className="edit-url-container">
  <a className="edit-url" href="https://github.com/ag2ai/ag2/edit/main/website/docs/_blogs/2025-01-10-WebSockets/index.mdx" target="_blank"><Icon icon="pen" iconType="solid" size="13px" /> Edit this page</a>
</div>