
Harish Mohan Raj
Software Engineer at AG2.ai
 **TL;DR**
* **Instant Multi-Agent UI with CopilotKit**: Connect AG2's powerful multi-agent systems to polished React UIs without building custom components.
* **Standardized Communication**: Uses the AG UI protocol to create a consistent bridge between frontend and backend, eliminating custom API development.
* **Rapid Development**: Build production-ready AG2 powered AI applications in hours through pre-built and custom UI components using CopilotKit.
* **Ready to Go**: Starter repo containing sample code for a travel planning assistant to get you started immediately.
We’re excited to announce that CopilotKit now integrates with AG2, bringing together AG2’s multi-agent orchestration capabilities with CopilotKit’s React UI components. This integration creates a more seamless development experience for building AI-powered applications.
## Why This Integration Matters for Developers
Building applications with intuitive interfaces that connect to AI backends presents several practical challenges:
1. **Interface Development**: Creating intuitive interfaces for users to interact with LLM-powered backends requires building custom components for various functionalities—chat interfaces, approval workflows, login forms, and UI elements that dynamically respond to LLM outputs. Developing these components is time-consuming and difficult to maintain.
2. **Backend Integration**: Connecting React applications to LLM powered backends typically requires custom API development and complex state management, especially when handling streaming responses or maintaining conversation context.
3. **Protocol Standardization**: Without a common protocol, developers must build custom solutions for message passing between frontend and backend, often resulting in brittle implementations.
4. **Maintenance Overhead**: As AI technologies evolve, maintaining compatibility between frontend and backend components requires ongoing developer attention.
By communicating over a common protocol and leveraging CopilotKit’s out-of-the-box components, developers can integrate AI capabilities into existing applications or create new ones in hours rather than weeks or months.
## AG2-CopilotKit Integration in Action
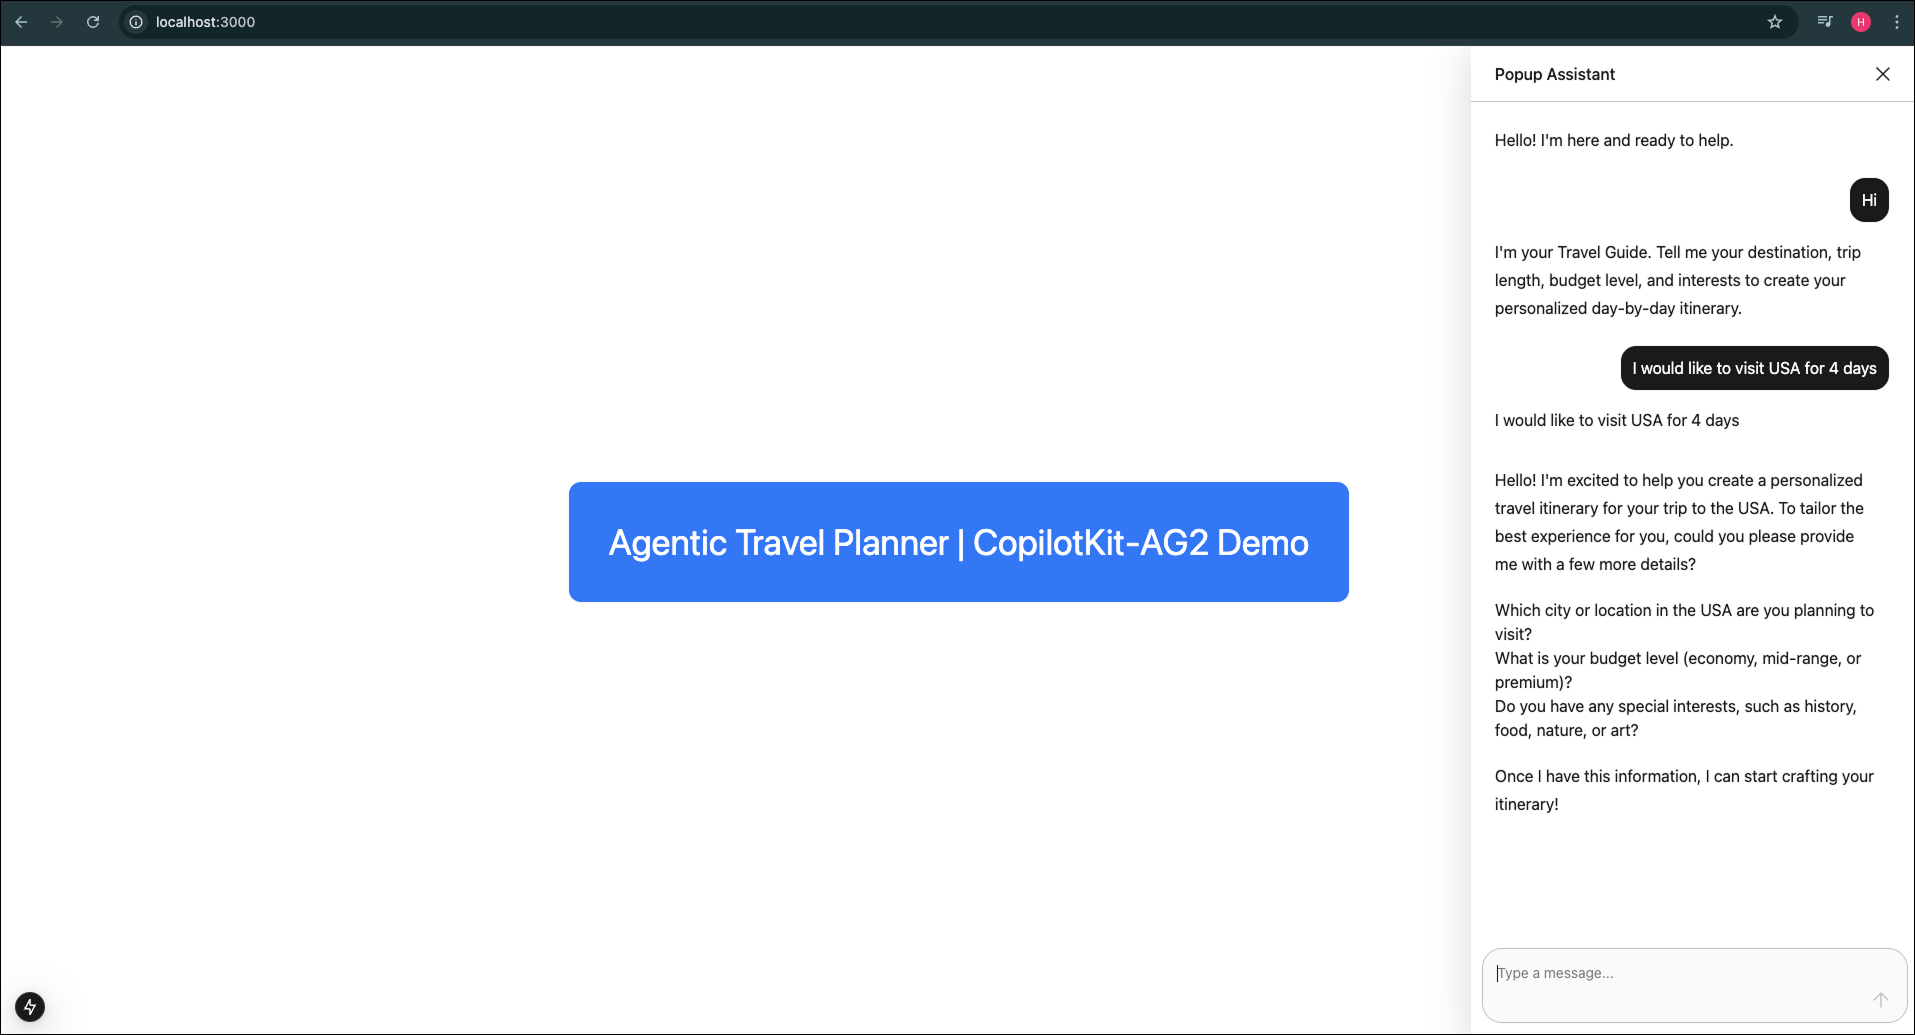
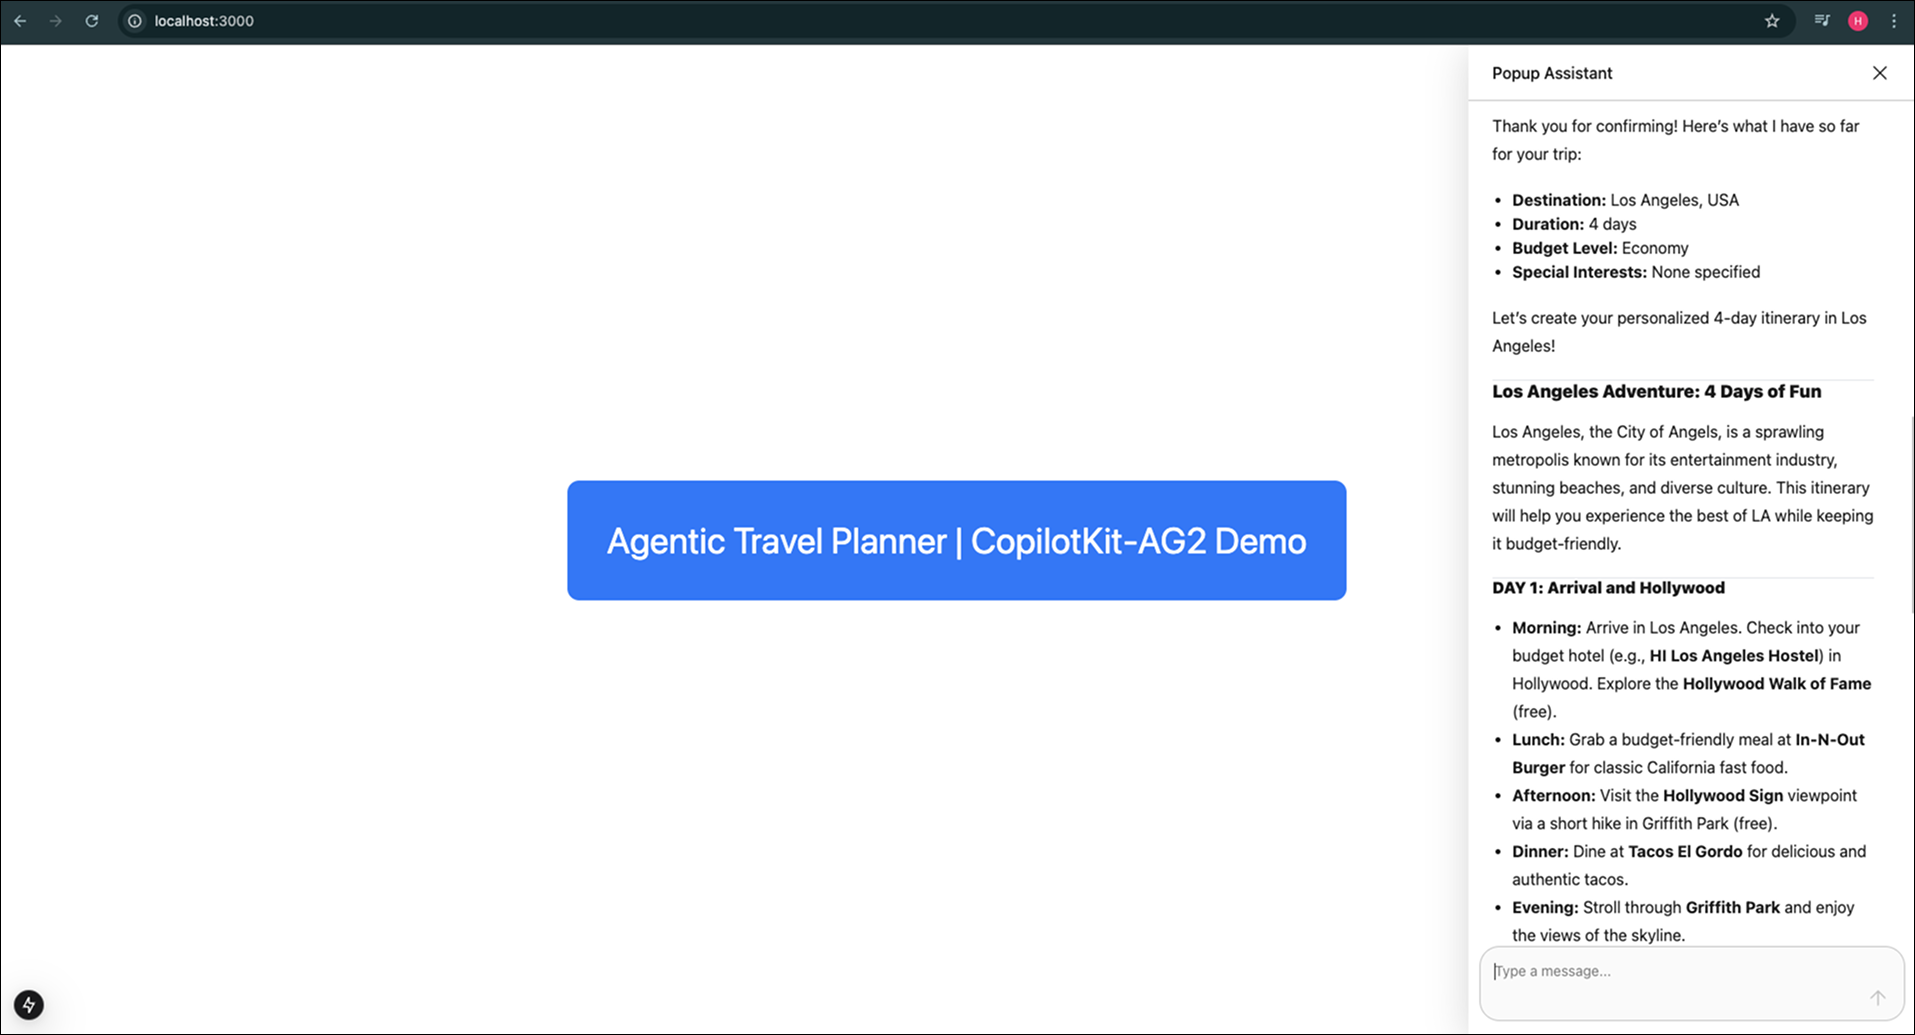
Let’s see how this integration works by building a travel planning assistant that helps users create personalized itineraries.
**TL;DR**
* **Instant Multi-Agent UI with CopilotKit**: Connect AG2's powerful multi-agent systems to polished React UIs without building custom components.
* **Standardized Communication**: Uses the AG UI protocol to create a consistent bridge between frontend and backend, eliminating custom API development.
* **Rapid Development**: Build production-ready AG2 powered AI applications in hours through pre-built and custom UI components using CopilotKit.
* **Ready to Go**: Starter repo containing sample code for a travel planning assistant to get you started immediately.
We’re excited to announce that CopilotKit now integrates with AG2, bringing together AG2’s multi-agent orchestration capabilities with CopilotKit’s React UI components. This integration creates a more seamless development experience for building AI-powered applications.
## Why This Integration Matters for Developers
Building applications with intuitive interfaces that connect to AI backends presents several practical challenges:
1. **Interface Development**: Creating intuitive interfaces for users to interact with LLM-powered backends requires building custom components for various functionalities—chat interfaces, approval workflows, login forms, and UI elements that dynamically respond to LLM outputs. Developing these components is time-consuming and difficult to maintain.
2. **Backend Integration**: Connecting React applications to LLM powered backends typically requires custom API development and complex state management, especially when handling streaming responses or maintaining conversation context.
3. **Protocol Standardization**: Without a common protocol, developers must build custom solutions for message passing between frontend and backend, often resulting in brittle implementations.
4. **Maintenance Overhead**: As AI technologies evolve, maintaining compatibility between frontend and backend components requires ongoing developer attention.
By communicating over a common protocol and leveraging CopilotKit’s out-of-the-box components, developers can integrate AI capabilities into existing applications or create new ones in hours rather than weeks or months.
## AG2-CopilotKit Integration in Action
Let’s see how this integration works by building a travel planning assistant that helps users create personalized itineraries.
 ### Architecture Overview: How AG2 and CopilotKit Work Together
The AG2-CopilotKit integration leverages the AG UI protocol to standardize communication between frontend applications and AI agents.
### Architecture Overview: How AG2 and CopilotKit Work Together
The AG2-CopilotKit integration leverages the AG UI protocol to standardize communication between frontend applications and AI agents.
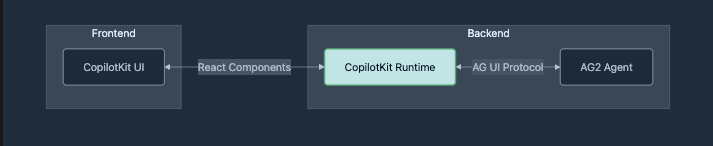 The architecture consists of three main components:
1. **CopilotKit UI Components**: React components that provide the chat interface and other UI elements.
2. **CopilotKit Runtime**: A middleware that handles communication between the frontend and backend.
3. **AG2 Agent**: The backend agent system powered by AG2 and exposed via FastAgency.
The AG UI protocol creates a standardized way for these components to exchange messages, states, and actions, making integration more consistent across different frameworks and platforms.
### Starting with the Starter Kit
The easiest way to get started is with the AG2-CopilotKit starter repository:
```bash theme={null}
git clone https://github.com/ag2ai/ag2-copilotkit-starter.git
cd ag2-copilotkit-starter
```
This repository contains a complete example of an AG2-powered multi-agent system integrated with CopilotKit.
### Prerequisites
Before you begin, you’ll need:
* Python 3.9 or newer
* Node.js 18.18.0 or newer
* pnpm (for package management)
* OpenAI API key
### Backend Setup: AG2 Multi-Agent System
The backend is built with FastAgency, a framework that simplifies creating and deploying AG2 agents. Let’s examine the key components and start with our simple\_workflow\.py file:
```python theme={null}
# Initialize the workflowfrom fastagency import UI
from fastagency.adapters.awp import AWPAdapter
from fastagency.runtimes.ag2 import Workflow
wf = Workflow()
```
This code initializes an AG2 workflow that will contain your agent logic. Next, we register the workflow:
```python theme={null}
# Register the workflow
@wf.register(name="simple_learning", description="A simple travel itinerary generator workflow")
def simple_workflow(ui: UI, params: dict[str, Any]) -> str:
# Present the initial message to the user
initial_message = ui.text_input(
sender="Workflow",
recipient="User",
prompt=INITIAL_MESSAGE,
)
# Configure and run the agents
# ...
return ui.process(response)
```
This function:
* Registers our FastAgency workflow with a name and description
* Presents an initial message to the user
* Configures agents to handle the conversation
* Processes and returns the response
Finally, we expose the workflow through FastAgency and FastAPI:
```python theme={null}
# Set up FastAPI with the AWP adapter
adapter = AWPAdapter(provider=wf)
app = FastAPI()
app.include_router(adapter.router)
```
This creates an endpoint that speaks the AG UI protocol, making our agent accessible to frontend applications. For more details, check the FastAgency documentation.
To start the backend, run the following commands from the root directory:
!!! note
We recommend using a virtual environment for your project to keep your packages contained. See venv.
!!! note
Before running the below commands, make sure to set your `OPENAI_API_KEY` as an environment variable. This example uses `gpt-4o-mini`, but you can replace it with any other [model](https://docs.ag2.ai/latest/docs/user-guide/models/amazon-bedrock/) supported by AG2.
```bash theme={null}
# macOS / Linux
export OPENAI_API_KEY="YOUR_API_KEY"
# Windows
setx OPENAI_API_KEY "YOUR_API_KEY"
```
```bash theme={null}
cd agent-py
pip install -r requirements.txt
uvicorn simple_workflow:app --port 8008 --reload
```
### Frontend Setup: CopilotKit Integration
The frontend integration consists of three main parts:
**1. API Route Configuration** (`ui/app/api/copilotkit/route.ts`):
```tsx theme={null}
import { CopilotRuntime, CustomHttpAgent } from "@copilotkit/runtime";
import { copilotRuntimeHandler } from "@copilotkit/runtime/nextjs";
// Connect to the AG2 backend server
const BASE_URL = "http://127.0.0.1:8008";
const agenticChatAgent = new CustomHttpAgent({
url: `${BASE_URL}/fastagency/awp`,
});
const runtime = new CopilotRuntime({
agents: {
agenticChatAgent,
},
});
export const { GET, POST } = copilotRuntimeHandler(runtime);
```
This code:
* Creates a connection to our AG2 backend using the AG UI protocol
* Sets up a CopilotKit runtime with our agent
* Exports handlers for `Next.js` API routes
**2. CopilotKit Provider** (`ui/app/layout.tsx`):
```tsx theme={null}
import { CopilotKit } from "@copilotkit/react-core";
import "@copilotkit/react-ui/styles.css";
export default function RootLayout({ children }: { children: any }) {
return (
The architecture consists of three main components:
1. **CopilotKit UI Components**: React components that provide the chat interface and other UI elements.
2. **CopilotKit Runtime**: A middleware that handles communication between the frontend and backend.
3. **AG2 Agent**: The backend agent system powered by AG2 and exposed via FastAgency.
The AG UI protocol creates a standardized way for these components to exchange messages, states, and actions, making integration more consistent across different frameworks and platforms.
### Starting with the Starter Kit
The easiest way to get started is with the AG2-CopilotKit starter repository:
```bash theme={null}
git clone https://github.com/ag2ai/ag2-copilotkit-starter.git
cd ag2-copilotkit-starter
```
This repository contains a complete example of an AG2-powered multi-agent system integrated with CopilotKit.
### Prerequisites
Before you begin, you’ll need:
* Python 3.9 or newer
* Node.js 18.18.0 or newer
* pnpm (for package management)
* OpenAI API key
### Backend Setup: AG2 Multi-Agent System
The backend is built with FastAgency, a framework that simplifies creating and deploying AG2 agents. Let’s examine the key components and start with our simple\_workflow\.py file:
```python theme={null}
# Initialize the workflowfrom fastagency import UI
from fastagency.adapters.awp import AWPAdapter
from fastagency.runtimes.ag2 import Workflow
wf = Workflow()
```
This code initializes an AG2 workflow that will contain your agent logic. Next, we register the workflow:
```python theme={null}
# Register the workflow
@wf.register(name="simple_learning", description="A simple travel itinerary generator workflow")
def simple_workflow(ui: UI, params: dict[str, Any]) -> str:
# Present the initial message to the user
initial_message = ui.text_input(
sender="Workflow",
recipient="User",
prompt=INITIAL_MESSAGE,
)
# Configure and run the agents
# ...
return ui.process(response)
```
This function:
* Registers our FastAgency workflow with a name and description
* Presents an initial message to the user
* Configures agents to handle the conversation
* Processes and returns the response
Finally, we expose the workflow through FastAgency and FastAPI:
```python theme={null}
# Set up FastAPI with the AWP adapter
adapter = AWPAdapter(provider=wf)
app = FastAPI()
app.include_router(adapter.router)
```
This creates an endpoint that speaks the AG UI protocol, making our agent accessible to frontend applications. For more details, check the FastAgency documentation.
To start the backend, run the following commands from the root directory:
!!! note
We recommend using a virtual environment for your project to keep your packages contained. See venv.
!!! note
Before running the below commands, make sure to set your `OPENAI_API_KEY` as an environment variable. This example uses `gpt-4o-mini`, but you can replace it with any other [model](https://docs.ag2.ai/latest/docs/user-guide/models/amazon-bedrock/) supported by AG2.
```bash theme={null}
# macOS / Linux
export OPENAI_API_KEY="YOUR_API_KEY"
# Windows
setx OPENAI_API_KEY "YOUR_API_KEY"
```
```bash theme={null}
cd agent-py
pip install -r requirements.txt
uvicorn simple_workflow:app --port 8008 --reload
```
### Frontend Setup: CopilotKit Integration
The frontend integration consists of three main parts:
**1. API Route Configuration** (`ui/app/api/copilotkit/route.ts`):
```tsx theme={null}
import { CopilotRuntime, CustomHttpAgent } from "@copilotkit/runtime";
import { copilotRuntimeHandler } from "@copilotkit/runtime/nextjs";
// Connect to the AG2 backend server
const BASE_URL = "http://127.0.0.1:8008";
const agenticChatAgent = new CustomHttpAgent({
url: `${BASE_URL}/fastagency/awp`,
});
const runtime = new CopilotRuntime({
agents: {
agenticChatAgent,
},
});
export const { GET, POST } = copilotRuntimeHandler(runtime);
```
This code:
* Creates a connection to our AG2 backend using the AG UI protocol
* Sets up a CopilotKit runtime with our agent
* Exports handlers for `Next.js` API routes
**2. CopilotKit Provider** (`ui/app/layout.tsx`):
```tsx theme={null}
import { CopilotKit } from "@copilotkit/react-core";
import "@copilotkit/react-ui/styles.css";
export default function RootLayout({ children }: { children: any }) {
return (